
| Chapter 18. Using the wxWidgets Component in SIMPOL | ||
|---|---|---|
 | Part VII. User-Interface Components |  |
Chapter 18. Using the wxWidgets Component in SIMPOL
In this chapter we will cover the basics of using the wxWidgets support in SIMPOL. Currently this component is available for Win32 and Linux. Other platforms will follow. We have every expectation that the other platforms will come up fairly quickly, since the wxWidgets toolkit is by nature a cross-platform toolkit.
![[Note]](images/note.png) | Note |
|---|---|
For information about developing data-aware form applications, see Part X, “Programming Data-Aware Form Programs”. |
All of the main examples in this chapter are available in the
projects\examples directory.
Windows and Dialogs
Introduction to Windows and Dialogs
The window support in SIMPOL using the wxWidgets component is designed to allow the creation of a broad variety of windows. Currently we only support the creation of a top-level window or a dialog. The dialog can be either modal or non-modal. The windows can have either sizeable or simple borders; they can have various types of controls such as vertical and horizontal scroll bars (in various styles), the maximize button, the minimize button, the visibility button (this is the close button — it is called the visibility button in SIMPOL because it only affects whether the window is shown or not, it is not destroyed when the user clicks this button, that is left to the programmer). For full details of what is available, see the "wxwindow" entry in the "The wxWidgets-based (WXWN) Components" of the "Components" appendix in the "SIMPOL Language Reference".
| Note |
|---|---|
If you wish to have scrollbars on the window, or specify which buttons are shown, this must be decided when the window is created, these things cannot be modified after the window has been created! |
Windows are not simply provided to house a form, although to start with, that is all that they are able to do. Windows in SIMPOL have been designed with the idea of containership, so that later on, other types of content can be placed into a window without requiring the additional overhead of placing that content on a form. An example might be a terminal or console control that is used to provide a console window with output from the program and input from the user. Another use might be to house a document filter for display of images and other content types in a free-floating window. For this reason it is not a good idea to get into the habit of thinking that windows and forms in SIMPOL are synonymous. It is better to think of a form as one of the types of content that a window can provide.
In order to process the events that occur when a window is shown, there is a special
function, called wxprocess() that is responsible for processing all
of the events that occur in the wxWidgets-based controls in all windows (except for modal
dialogs). This function takes a single parameter that tells it how long to process events
before returning. In many cases, you may wish to leave the program in this processing state
for the entire duration of the program once you have done the initialization and shown the
first window. In that case, passing the value .inf to the function will
keep it processing messages until you call the wxbreak() function. As
an alternative, you can place the wxprocess() call in a loop and have it exit the call
after a set period of time.
Creating a Single Window
It is best to start out working with windows by creating a single standard window.
Examine the small example program below (it can be found in the projects\examples directory.
function main()
  wxwindow w
  integer iErrnum
  string sResult

  iErrnum = 0
  w =@ wxwindow.new(0, 0, 640, 480, captiontext="Main test window", \
                    error=iErrnum)
  if w =@= .nul
    sResult = "Error number: " + .tostr(iErrnum, 10) + " opening \
               main window{d}{a}"
  else
    w.onvisibilitychange.function =@ quit
    wxprocess(.inf)
  end if
end function sResult


function quit(wxwindow w)
  wxbreak()
end function
As can be seen from the above example, the window is created by calling the
new() method of the wxwindow type. Almost all of the
features of the wxwindow object can be specified during creation, and some
must be specified at that time since they cannot later be changed.
The example defaults to showing the window once it has been created, as well as various
other features, such as having a system menu, minimize and maximize buttons, making the
window sizeable, and so on. The next thing is the assignment of a function to handle the
onvisibilitychange event. This event is called when the user takes
some action to dismiss the window. Instead of the window being closed, it is hidden. If the
programmer has defined a handler for the onvisibilitychange event, then
that function will be called and it will be passed the object responsible for the call, in
this case the wxwindow object represented by the variable w in the
main() function.
In the example the argument to the wxprocess() function was the
value .inf, so it is essential to assign an event handler to the window's
onvisibilitychange event. Otherwise the window will be hidden when
the user clicks on the button but the thread will continue
indefinitely and since there is no longer any method of closing the window the program will
not exit unless closed externally (using Ctrl+C from the command line or → from the IDE).
Creating Multiple Windows
Building upon the beginning made in the previous section, creating additional windows is also quite simple. The following program demonstrates the creation of the main window from the first example followed by the creation of two other windows.
function main()
  wxwindow w, w2, w3, w4
  integer iErrnum
  string sResult

  iErrnum = 0
  w =@ wxwindow.new(0, 0, 320, 240, captiontext="Main test \
                    window", error=iErrnum)
  if w =@= .nul
    sResult = "Error number: " + .tostr(iErrnum, 10) + " opening \
               main window{d}{a}"
  else
    w.onvisibilitychange.function =@ quit
    w2 =@ wxwindow.new(320, 0, 320, 240, captiontext="Second test \
                       window", error=iErrnum,\
                       menubutton=.false, border="simple",\
                       backgroundrgb=0xFFFFFF, vscrollbar=.true,\
                       hscrollbar=.true)
    if w2 =@= .nul
      sResult = "Error number: " + .tostr(iErrnum, 10) + \
                " opening second window{d}{a}"
    else
      w3 =@ wxwindow.new(0, 240, 320, 240, captionbar=.false, \
                         error=iErrnum, vscrollbar=.true)
      if w3 =@= .nul
        sResult = "Error number: " + .tostr(iErrnum, 10) + \
                  " opening third window{d}{a}"
      else
        w4 =@ wxwindow.new(320, 240, 320, 240, \
                           captiontext="Fourth test window", \
                           error=iErrnum, maxbutton=.false, \
                           backgroundrgb=0xC0C0C0)
        w2.onvisibilitychange.function =@ quit
        w3.onvisibilitychange.function =@ quit
        w4.onvisibilitychange.function =@ quit
        wxprocess(.inf)
      end if
    end if
  end if
end function sResult


function quit(wxwindow w)
  wxbreak()
end function
The program above is somewhat more complicated than the earlier program, but the basic
technique of creating the windows hasn't changed. Please note that all of the windows
are top level windows. The way the program is currently written, closing any of the
windows will close all of them. This could easily be modified to use a different (or
no function) to handle the closing of all but one of the windows, to prevent the
program from exiting except, for example, when the main window is closed. The second
window has been created so that it cannot be resized and has no buttons or system menu.
It can be closed only using the Alt+F4 keyboard combination, as can the third window, which has
no caption and therefore no close gadget or system menu. The fourth window can be resized
but not maximized. Most commonly you might actually make the window not resizeable and
take away the maximize button if you wanted to prevent any resizing. Two of the windows
have the default background window color for the operating system, one has the color
white and the last has the color gray.
Working with Dialogs
Dialog windows in SIMPOL are very similar to regular windows. The only significant difference is the fact that dialogs can be shown modally. That means that no further access to the application via the GUI is available as long as the dialog is displayed. The user must deal with the modally displayed dialog before they can continue. This is the way most dialogs are displayed. Another type of dialog is the non-modal dialog. These dialogs always stay in front of the windows of the application, but it is possible to click on the windows behind while the dialog is displayed. This sort of dialog is often used for things like a "Find and Replace" dialog in a word processor, where the user should still be able to click into the document while the dialog is displayed. One significant change from the older SBL language is that forms are used both in windows and in dialogs, unlike the older product that differed between forms and dialogs, including having different properties and events for things like editable text controls.
Modal Dialogs
The wxprocess() is not used to handle events for a modal dialog,
but rather the dialog has a special method for showing itself modally and for handling
events while it is shown. The processmodal()) method is called
to show the dialog and handle events while it is shown. See the examples below:
function main()
  wxdialog d
  integer e

  e = 0
  d =@ wxdialog.new(1, 1, 600, 400, captiontext="Hello World", visible=.false, error=e)
  if d !@= .nul
    d.processmodal(.inf)
  end if
end function
This dialog program is very simple. Unlike the one for the
wxwindow type, there is no quit() function and no
onvisibilitychange event handler. An important point to note
is that the dialog was created with the visible parameter set to
.false. It is then shown using the processmodal()
method of the wxdialog type. Again the value.inf is supplied.
If the dialog is created with the parameter visible set to
.true, then it must be managed by a wxprocess()
statement.
When a modal dialog is set to invisible, it automatically exits the
processmodal() method. This happens if the user clicks the close
gadget of the window. It can also be done programmatically, in an event handling function
called by a button on a form, as shown in the next example.
function main()
  wxform f
  integer e
  wxdialog d
  wxformbutton b

  e = 0
  f =@ wxform.new(100, 80, 0xC0C0C0, error=e)
  if f !@= .nul
    f.addcontrol(wxformtext, 10, 10, 80, 20, "Hello world!")
    b =@ f.addcontrol(wxformbutton, 30, 55, 40, 22, "OK")
    b.onclick.function =@ quit
    // It is essential to create the dialog invisible, since
    // otherwise it will already be shown and cannot be then
    // shown modally.
    d =@ wxdialog.new(50, 50, innerwidth=f.width, \
                      innerheight=f.height, captiontext="Hello", \
                      visible=.false, error=e)
    if d !@= .nul
      f.setcontainer(d)
      d.processmodal(.inf)
    end if
  end if
end function


function quit(wxformbutton me)
  // Setting a modal dialog to invisible is the only
  // programmatic way to close the dialog.
  me.form.container.setvisible(.false)
end function
Note that it is important to create the dialog invisibly. If it is not, then it will
cause an error when you try to show it using the processmodal())
method, since it is already being shown. To close the modal dialog programmatically,
all that is required is to set its visibility back to .false.
Non-Modal Dialogs
Non-modal dialogs are created in exactly the same way as modal dialogs. The only
significant difference is that non-modal dialogs are simply shown, either by creating
them visibly, or by setting them to visible, and their events are handled by the
wxprocess() function. Here is the same sample modified to be
non-modal:
function main()
  wxform f
  integer e
  wxdialog d
  wxformbutton b

  e = 0
  f =@ wxform.new(100, 80, 0xC0C0C0, error=e)
  if f !@= .nul
    f.addcontrol(wxformtext, 10, 10, 80, 20, "Hello world!")
    b =@ f.addcontrol(wxformbutton, 30, 55, 40, 22, "OK")
    b.onclick.function =@ quit
    // It is still good to create the dialog invisible and then
    // show it after loading the form into it.
    d =@ wxdialog.new(50, 50, innerwidth=f.width, \
                      innerheight=f.height, captiontext="Hello", \
                      visible=.false, error=e)
    // Now we need to trap the onvisibilitychange event (closing
    // the window), since if we don't, the window will close and
    // the program will not.

    d.onvisibilitychange.function =@ quit

    if d !@= .nul
      f.setcontainer(d)
      d.setvisible(.true)
      wxprocess(.inf)
    end if
  end if
end function


function quit(type(*) me)
  // Here we allow dual use of the function
  wxbreak()
end function
Dialogs Using Standard Buttons
Another area where dialogs can differ, is that on many operating systems they have a specific look and feel associated with them. Thanks to the cross-platform nature of the wxWidgets library, SIMPOL provides an additional capability to the dialogs, called "Standard Buttons". By using this functionality, the dialog buttons such as and or and are created and managed by the dialog, rather than being placed by the programmer. This ensures that they are handled correctly for each target platform. For example, on the Macintosh it is customary to put the on the left, whereas the same button is found on the right on Microsoft Windows.
| Note |
|---|---|
Currently the only style of dialog that will close when the user presses the Esc key is the one using standard buttons. |
Here is the modal-dialog example converted to use standard buttons:
function main()
  wxform f
  integer e
  wxdialog d

  e = 0
  f =@ wxform.new(100, 40, 0xC0C0C0, error=e)
  if f !@= .nul
    f.addcontrol(wxformtext, 10, 10, 80, 20, "Hello world!")
    // It is essential to create the dialog invisible, since
    // otherwise it will already be shown and cannot be then
    // shown modally.
    d =@ wxdialog.new(50, 50, innerwidth=f.width, innerheight= \
                      f.height, captiontext="Hello", \
                      visible=.false, stdbuttons="ok", error=e)
    if d !@= .nul
      d!ok.onclick.function =@ quit
      f.setcontainer(d)
      d.processmodal(.inf)
    end if
  end if
end function


function quit(wxdialogstdbutton me)
  // Setting a modal dialog to invisible is the only programmatic
  // way to close the dialog.
  me.dialog.setvisible(.false)
end function
When you run this program, you may find that it looks a bit strange. That is because
the area of the dialog that is controlled by the standard buttons support may be in a
different color. The reason for this is that when using the standard buttons, the
default font and default system colors are used for the various components, together
with where they are supposed to be positioned in the dialog itself.

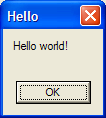
The wxdialog with standard buttons, showing the color problem.
The solution to this is to use the default system font and default system colors for
the form and controls on the form that is being shown in the dialog. To make this
easier, there is a supplied library called uisyshelp.sml that contains a function called
getdefaultfont() that returns the default system font as a
wxfont object. Another useful item in the library is the syscolors type.
Just create an object of this type and call the new() method
of the type assigning it to the variable, and it will contain an array of all of the
available system colors. The total number of colors is found in the
count property. A SIMPOL source file called
uisyshelphdr.sma can be found in the include directory. That file contains the symbolic
constants for the various colors used on the various versions of Windows. Other
operating systems will also eventually be catered for by this library. The colors
are stored in the array as sysrgb objects. You can access the individual
color components or the entire color value, as shown below:
sysrgb color
syscolors colors
integer colorvalue, red, green, blue

colors =@ syscolors.new()
color =@ colors[COLOR_BTNFACE]
colorvalue = color.value
red = color.red
green = color.green
blue = color.blue
Another useful type is the windowsversion type. It is the return value
of the getwindowsversion() function. All of the components are
available as properties. If all that is needed is a string, the companion function
getwindowsversionstring() will prove handy. Finally, two more
companion functions provide information about the display size. The function
getdisplaysize() returns the size of the physical display and
the getusabledisplaysize() returns the size of the display
minus the area used by the taskbar.
Using the facilities provided by uisyshelp.sml
it is possible to rewrite the standard buttons dialog to not have the color problem.
Also, to ensure that the font used in the text in the dialog is consistent with that
used by the buttons, the default system font is also retrieved. Here is the changed
program, please note that it requires the library file to be added to the project
settings and the include directory must be added to the include directories section:
uisyshelp.sml
include "uisyshelphdr.sma"
// This requires the uisyshelp.sml library to be added to the project
function main()
  wxform f
  integer e
  wxdialog d
  syscolors colors
  wxfont deffont
  sysrgb color

  e = 0
  colors =@ syscolors.new()
  f =@ wxform.new(100, 40, colors.colors[COLOR_BTNFACE].value, \
                  error=e)
  if f !@= .nul
    deffont =@ getdefaultfont()
    f.addcontrol(wxformtext, 10, 10, 80, 20, "Hello world!", font=\
                 deffont)
    // It is essential to create the dialog invisible, since
    // otherwise it will already be shown and cannot be then
    // shown modally.
    d =@ wxdialog.new(50, 50, innerwidth=f.width, innerheight=\
                      f.height, captiontext="Hello", \
                      visible=.false, stdbuttons="ok", error=e)
    if d !@= .nul
      d!ok.onclick.function =@ quit
      f.setcontainer(d)
      d.processmodal(.inf)
    end if
  end if
end function


function quit(wxdialogstdbutton me)
  // Setting a modal dialog to invisible is the only programmatic
  // way to close the dialog.
  me.dialog.setvisible(.false)
end function
The results can be seen in the image below. The color is now consistent throughout and
the font has changed slightly (the letter "H" in "Hello" is taller and the rendering of
the "rl" is different).
The wxdialog with standard buttons, without the color problem.